Lesson 2 - Cluster Administration
The HAWQ gpadmin administrative user has super-user capabilities on all HAWQ databases and HAWQ cluster management commands.
HAWQ configuration parameters affect the behaviour of both the HAWQ cluster and individual HAWQ nodes.
This lesson introduces basic HAWQ cluster administration tasks. You will view and update HAWQ configuration parameters.
Note: Before installing HAWQ, you or your administrator choose to configure and manage the HAWQ cluster either using the command line or using the Ambari UI. You will perform command line and Ambari exercises for managing your HAWQ cluster in this lesson. Although you are introduced to both, command line and Ambari HAWQ cluster management modes should not be mixed.
Prerequisites
Ensure that you have Set Up your HAWQ Runtime Environment and that your HAWQ cluster is up and running.
Exercise: View and Update HAWQ Configuration from the Command Line
If you choose to manage your HAWQ cluster from the command line, you will perform many administrative functions using the hawq utility. The hawq command line utility provides subcommands including start, stop, config, and state.
In this exercise, you will use the command line to view and set HAWQ server configuration parameters.
Perform the following steps to view the HAWQ HDFS filespace URL and set the pljava_classpath server configuration parameter:
The
hawq_dfs_urlconfiguration parameter identifies the HDFS NameNode (or HDFS NameService if HDFS High Availability is enabled) host, port, and the HAWQ filespace location within HDFS. Display the value of this parameter:gpadmin@master$ hawq config -s hawq_dfs_url GUC : hawq_dfs_url Value : <hdfs-namenode>:8020/hawq_dataMake note of the
hostname or IP address returned, you will need this in Lesson 6: HAWQ Extension Framework (PXF). The HAWQ PL/Java
pljava_classpathserver configuration parameter identifies the classpath used by the HAWQ PL/Java extension. View the currentpljava_classpathconfiguration parameter setting:gpadmin@master$ hawq config -s pljava_classpath GUC : pljava_classpath Value :The value is currently not set, as indicated by the empty
Value.Your HAWQ installation includes an example PL/Java JAR file. Set
pljava_classpathto include theexamples.jarfile installed with HAWQ:gpadmin@master$ hawq config -c pljava_classpath -v 'examples.jar' GUC pljava_classpath does not exist in hawq-site.xml Try to add it with value: examples.jar GUC : pljava_classpath Value : examples.jarThe message ‘GUC pljava_classpath does not exist in hawq-site.xml; Try to add it with value: examples.jar’ indicates that HAWQ could not find a previous setting for
pljava_classpathand attempts to set this configuration parameter toexamples.jar, the value you provided with the-voption.You must reload the HAWQ configuration after setting a configuration parameter:
gpadmin@master$ hawq stop cluster --reload
20170411:19:58:17:428600 hawq_stop:master:gpadmin-[INFO]:-Prepare to do 'hawq stop'
20170411:19:58:17:428600 hawq_stop:master:gpadmin-[INFO]:-You can find log in:
20170411:19:58:17:428600 hawq_stop:master:gpadmin-[INFO]:-/home/gpadmin/hawqAdminLogs/hawq_stop_20170411.log
20170411:19:58:17:428600 hawq_stop:master:gpadmin-[INFO]:-GPHOME is set to:
20170411:19:58:17:428600 hawq_stop:master:gpadmin-[INFO]:-/usr/local/hawq/.
20170411:19:58:17:428600 hawq_stop:master:gpadmin-[INFO]:-Reloading configuration without restarting hawq cluster

Continue with HAWQ service stop Yy|Nn (default=N):
>
Reloading configuration does not actually stop the cluster, as noted in the INFO messages above.
HAWQ prompts you to confirm the operation. Enter
yto confirm:> y 20170411:19:58:22:428600 hawq_stop:master:gpadmin-[INFO]:-No standby host configured 20170411:19:58:23:428600 hawq_stop:master:gpadmin-[INFO]:-Reload hawq cluster 20170411:19:58:23:428600 hawq_stop:master:gpadmin-[INFO]:-Reload hawq master 20170411:19:58:23:428600 hawq_stop:master:gpadmin-[INFO]:-Master reloaded successfully 20170411:19:58:23:428600 hawq_stop:master:gpadmin-[INFO]:-Reload hawq segment 20170411:19:58:23:428600 hawq_stop:master:gpadmin-[INFO]:-Reload segments in list: ['segment'] 20170411:19:58:23:428600 hawq_stop:master:gpadmin-[INFO]:-Total segment number is: 1 .. 20170411:19:58:25:428600 hawq_stop:master:gpadmin-[INFO]:-1 of 1 segments reload successfully 20170411:19:58:25:428600 hawq_stop:master:gpadmin-[INFO]:-Segments reloaded successfully 20170411:19:58:25:428600 hawq_stop:master:gpadmin-[INFO]:-Cluster reloaded successfullyConfiguration parameter value changes made by
hawq configare system-wide; they are propagated to all segments across the cluster.
Exercise: View the State of Your HAWQ Cluster via Ambari
You may choose to use Ambari to manage the HAWQ deployment. The Ambari Web UI provides a graphical front-end to HAWQ cluster management activities.
Perform the following steps to view the state of your HAWQ cluster via the Ambari web console:
Start the Ambari web UI:
<ambari-server-node>:8080Ambari runs on port 8080.
Log in to the Ambari UI using the Ambari user credentials.
The Ambari UI dashboard window displays.
Select the HAWQ service from the service list in the left pane.
The HAWQ service page Summary tab is displayed. This page includes a Summary pane identifying the HAWQ master and all HAWQ segment nodes in your cluster. The Metrics pane includes a set of HAWQ-specific metrics tiles.
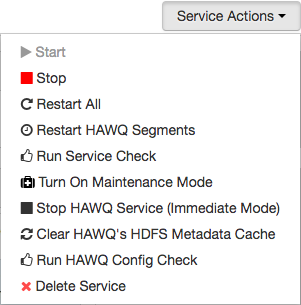
Perform a HAWQ service check operation by selecting the Run Service Check item from the Service Actions button drop-down menu and Confirming the operation.
The Background Operations Running dialog displays. This dialog identifies all service-related operations performed on your HAWQ cluster.
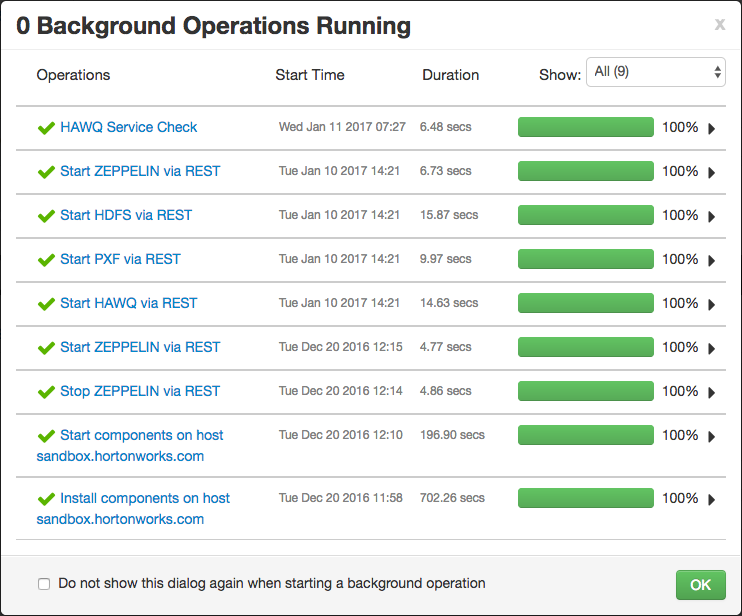
Select the most recent HAWQ Service Check operation from the top of the Operations column. Select the HAWQ master host name from the HAWQ Service Check dialog, and then select the Check HAWQ task.
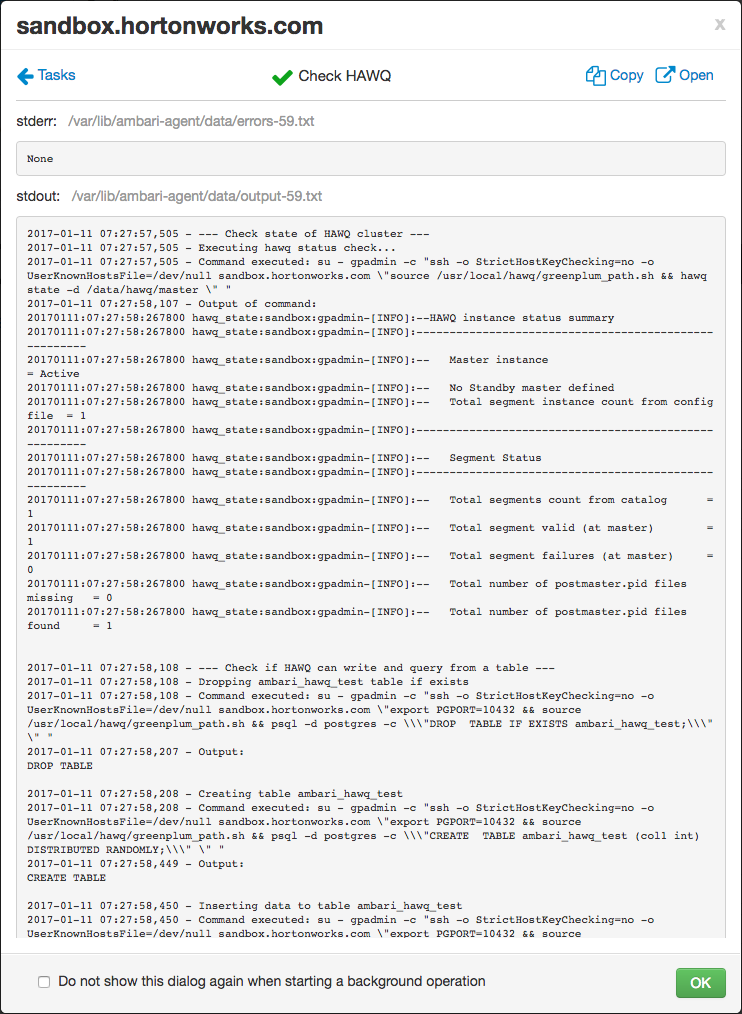
The Check HAWQ task dialog displays the output of the service check operation. This operation returns the state of your HAWQ cluster, as well as the results of HAWQ database operation tests performed by Ambari.
Exercise: View and Update HAWQ Configuration via Ambari
Perform the following steps to view the HDFS NodeName and set the HAWQ PL/Java pljava_classpath configuration parameter and value via Ambari:
Navigate to the HAWQ service page.
Select the Configs tab to view the current HAWQ-specific configuration settings.
HAWQ general settings displayed include master and segment data and temp directory locations, as well as specific resource management parameters.
Select the Advanced tab to view additional HAWQ parameter settings.
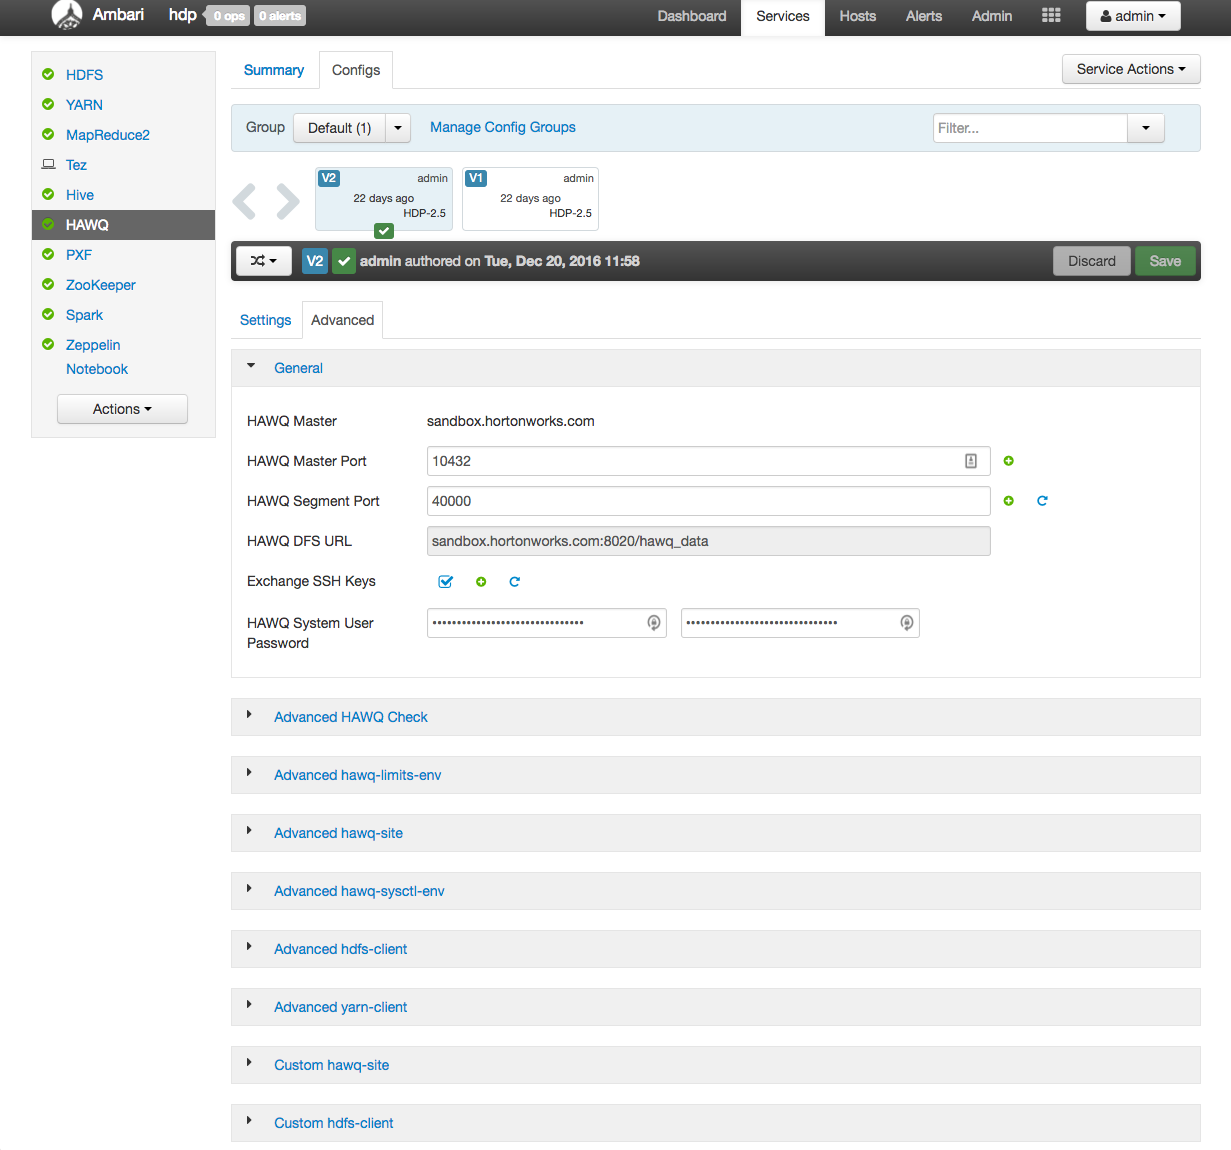
The General drop down pane opens. This tab displays information including the HAWQ master hostname and master and segment port numbers.
Locate the HAWQ DFS URL configuration parameter setting in the General pane. This value should match that returned by
hawq config -s hawq_dfs_urlin the previous exercise. Make note of the HDFS NameNode hostname or IP address if you have not done so previously.Note: The HDFS service, Configs > Advanced Configs tab also identifies the HDFS NameNode hostname.
Advanced <config> and Custom <config> drop down panes provide access to advanced configuration settings for HAWQ and other cluster components. Select the Advanced hawq-site drop down.
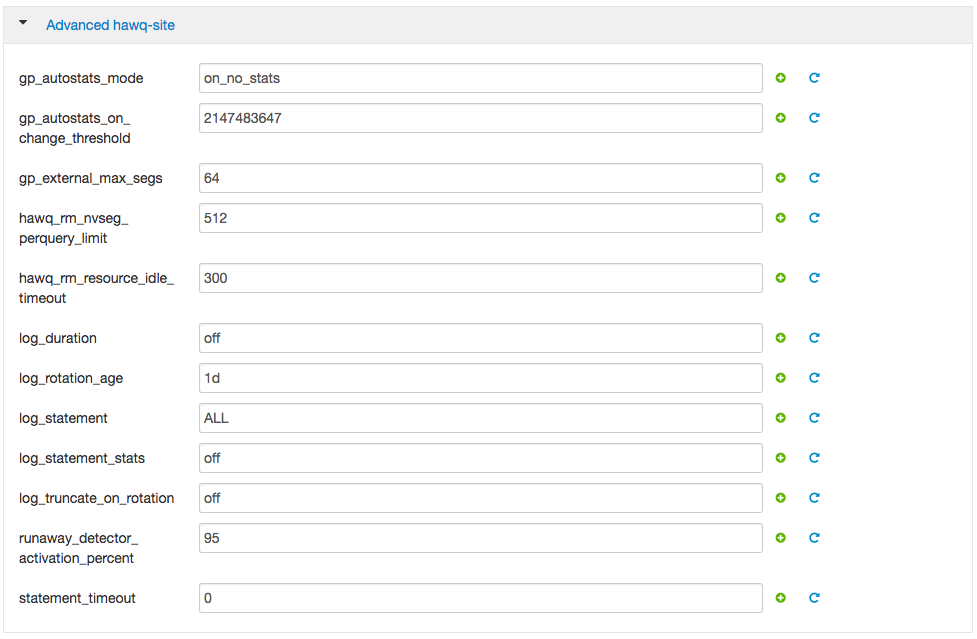
Specific HAWQ configuration parameters and values are displayed in the pane. Hover the mouse cursor over the value field to display a tooltip description of a specific configuration parameter.
Select the Custom hawq-site drop down.
Currently configured custom parameters and values are displayed in the pane. If no configuration parameters are set, the pane will be empty.
Select Add Property ….
The Add Property dialog displays. This dialog includes Type, Key, and Value entry fields.
Select the single property add mode (single label icon) in the Add Property dialog and fill in the fields:
Key: pljava_classpath
Value: examples.jar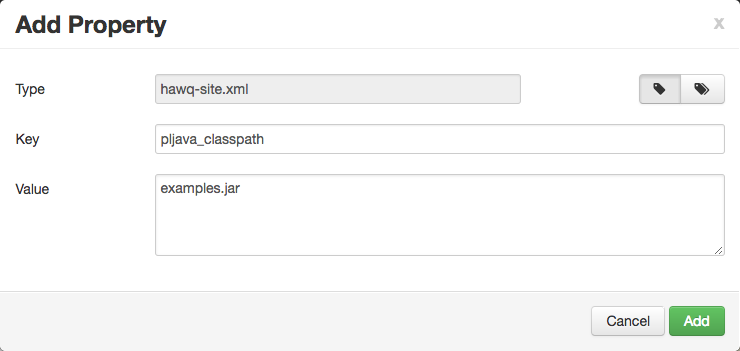
Add the custom property, then Save the updated configuration, optionally providing a Note in the Save Configuration dialog.

Notice the now orange-colored Restart button in the right corner of the window. You must restart the HAWQ service after adding or updating configuration parameter values through Ambari.
Select the orange Restart button to Restart All Affected HAWQ nodes.
You can monitor the restart operation from the Background Operations Running dialog.
When the restart operation completes, log out of the Ambari console by clicking the admin button and selecting the Sign out drop down menu item.
Summary
In this lesson, you viewed the state of the HAWQ cluster and learned how to change cluster configuration parameters.
For additional information on HAWQ server configuration parameters, see Server Configuration Parameter Reference.
The following table identifies HAWQ management commands used in the tutorial exercises. For detailed information on specific HAWQ management commands, refer to the HAWQ Management Tools Reference.
| Action | Command |
|---|---|
| Get HAWQ cluster status | $ hawq state |
| Start/stop/restart HAWQ <object> (cluster, master, segment, standby, allsegments) | $ hawq start <object> |
| List all HAWQ configuration parameters and their current settings | $ hawq config -l |
| Display the current setting of a specific HAWQ configuration parameter | $ hawq config -s <param-name> |
| Add/change the value of HAWQ configuration parameter (command-line managed HAWQ clusters only) | $ hawq config -c <param-name> -v <value> |
| Reload HAWQ configuration | $ hawq stop cluster --reload |
Lesson 3 introduces basic HAWQ database administration activities and commands.
Lesson 3: Database Administration